Face Recognization and Tracking
2021 Fall ECE 5725 Project
A Project By Yiling Peng (yp387) and Shuhan Ding (sd925).
Demonstration Video
Introduction
We implement a multifunctional, interactive pan tilt system. We use raspberry pi, camera, servos and gimble as hardware support and opencv, flask and python for software development. First of all, our pan tilt system achieves face recognition, and the faces of our team members can be recognized by training with Haar cascade. Secondly, we also apply the face tracking, controlling the servos to follow the face in real time. Finally, the flask framework is used to monitor and control the pan tilt through the web, which accomplish remote video viewing, and rotation of specific angles.

Project Objective:
- Achieve face recognition and tracking
- Realize pan tilt system controlled by servos
- Remote monitor and pan tilt control via web
Design
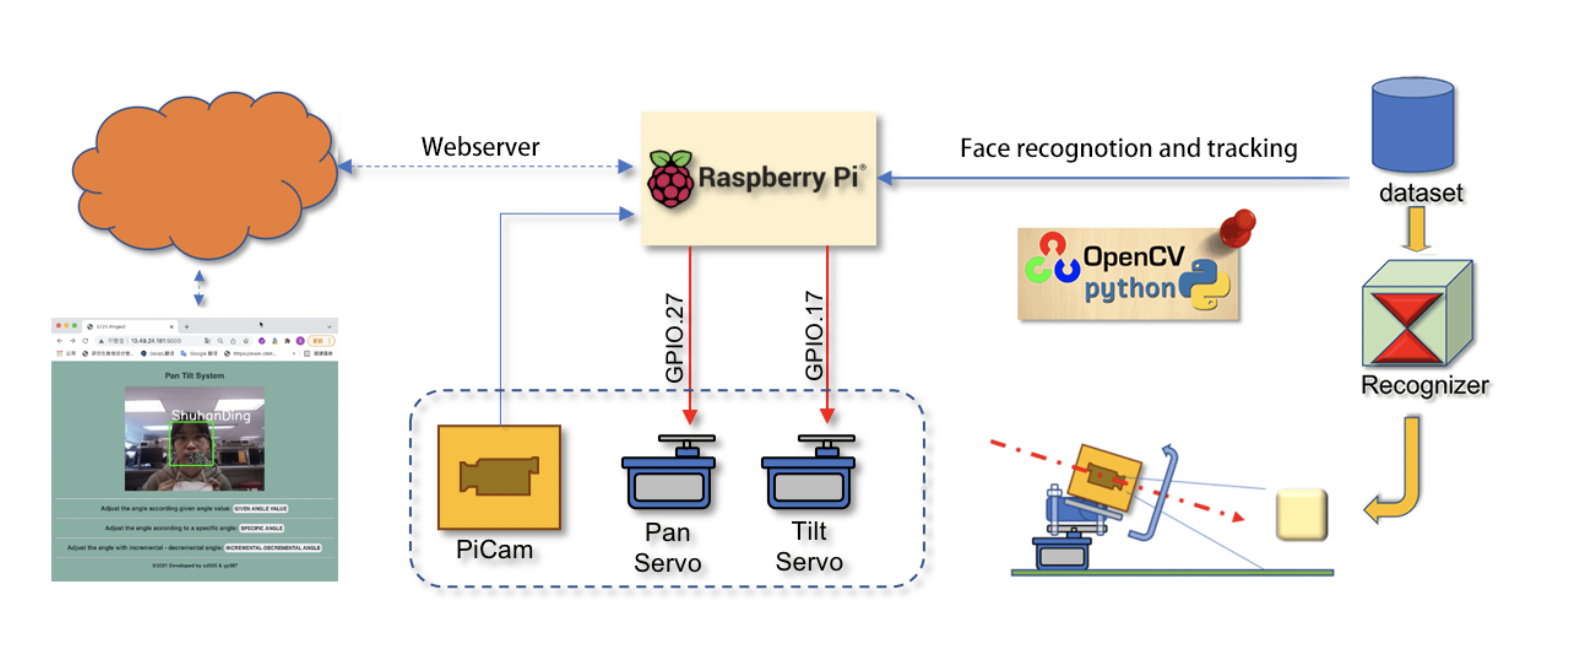
Face Recognition and Tracking
We implement face recognition and tracking through raspberry pi, picamera and opencv. We implement it step by step, namely face detection, recognition and tracking.
Step 1: Face Detection
The purpose of this step is mainly, to detect all the faces that appear in the video frame.
The most common way to detect a face is using the "Haar Cascade classifier". Object Detection using Haar feature-based cascade classifiers is an effective object detection method proposed by "Rapid Object Detection using a Boosted Cascade of Simple Features" in 2001. It is a machine learning based approach where a cascade function is trained from a lot of positive and negative images. It is then used to detect objects in other images.
OpenCV already contains many pre-trained classifiers for face, eyes, smile, etc. We have tried to implement face detection using XML files of faces. First, we load the "classifier" (Cascades/haarcascade_frontalface_default.xml'). Then, we call our classifier function, passing it important parameters, as scale factor, number of neighbors and minimum size of the detected face.
The function detects faces on the image. Next, we "mark" the faces in the image, using a blue rectangle. If faces are found, it returns the positions of detected faces as a rectangle with the left up corner (x,y) and having "w" as its Width and "h" as its Height ==> (x,y,w,h).
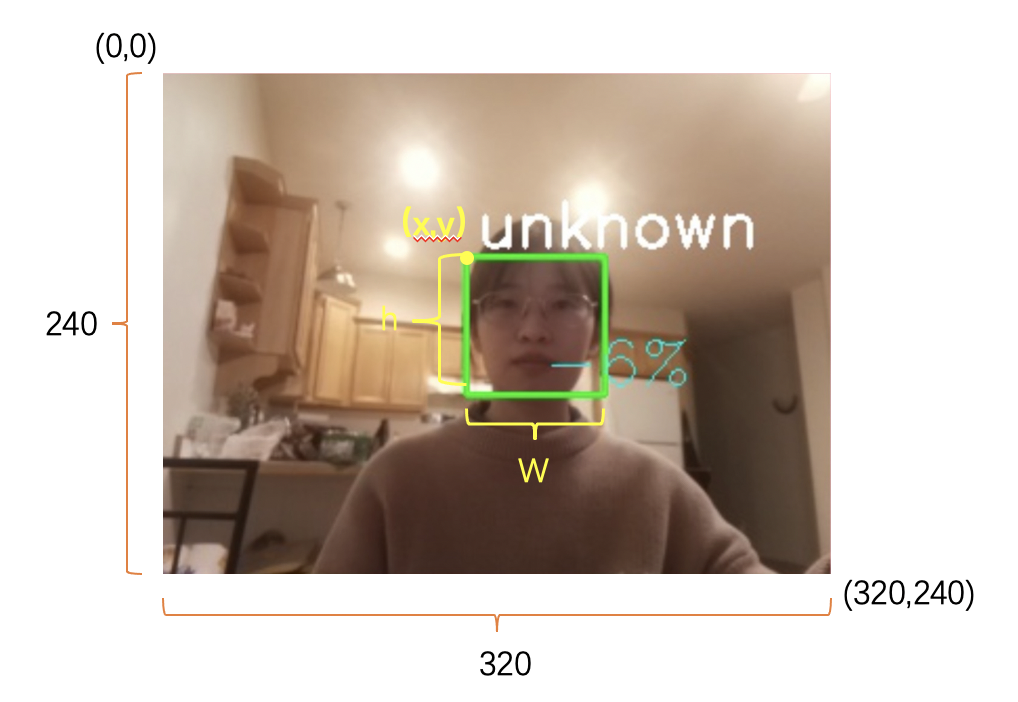
Step 2: Face Recognition
In the previous step, we have implemented the detection of faces and we need to further train our model to recognize specific faces (our team members).
First, we create a dataset, where we store for each id, a group of photos that was used for face detecting. We used picamera to collect 200 faces from different angles each and save it as a file on a "dataset" directory.

Next, we take all data from our dataset and train the Recognizer. This is done directly by a specific OpenCV function. We use the LBPH (LOCAL BINARY PATTERNS HISTOGRAMS) Face Recognizer. As a result, a file named "trainer.yml" will be saved.
Finally, we perform a test. we capture a fresh face on our camera and if this person had his face captured and trained before, our recognizer will make a "prediction" returning its id and an index, shown how confident the recognizer is with this match.
Step 3: Face Tracking
The idea here will be to position the face in the middle of the screen with the Pan Tilt mechanism.
First, we modify the "face recognition " code used before to print the x,y coordinates of the founded face. We want that our target stays always centered on the screen. So, we consider our "centered" if: 140 < x < 180 and 120 < y < 160. Outside of those boundaries, we must move our Pan Tilt mechanism to compensate deviation.
Based on that, we build the function mapServoPosition(x, y). Based on the (x, y) coordinates, servo position commands are generated, using the function positionServo(servo, angle). For example, suppose that y position is "50", what means that our object is almost in the top of the screen, that can be translated that out "camera sight" is "low" (let's say a tilt angle of 120 degrees) So we must "decrease" Tilt angle (let's say to 100 degrees), so the camera sight will be "up" and the object will go "down" on screen (y will increase to 190).

Pan-Tilt Servo Control
Multiple servos control, using Python and a PAN/TILT mechanism construction to PiCam positioning.
Step 1: Installing the pan tilt
The servos are connected to Raspberry Pi GPIO as below:
We also connected a resistor of 1K ohm between Raspberry Pi GPIO and Server data input pin. This would protect your RPi in case of a servo problem.

Step 2: Servos Calibration
From servos datasheet, we can consider:
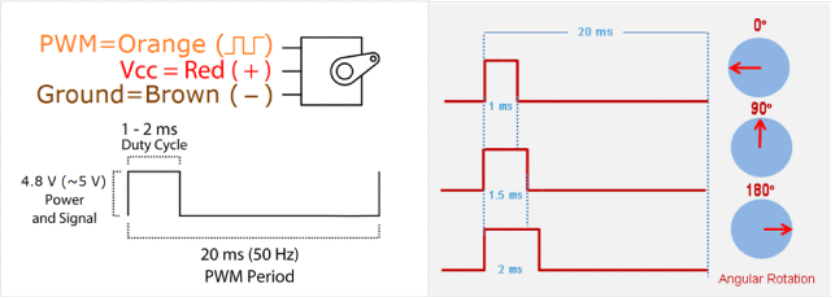
To program a servo position using Python depends on the correspondent "Duty Cycle" for the positions:
The Duty Cycle should vary on a range of 1 to 11%. So, given an angle, we can have a correspondent duty cycle:
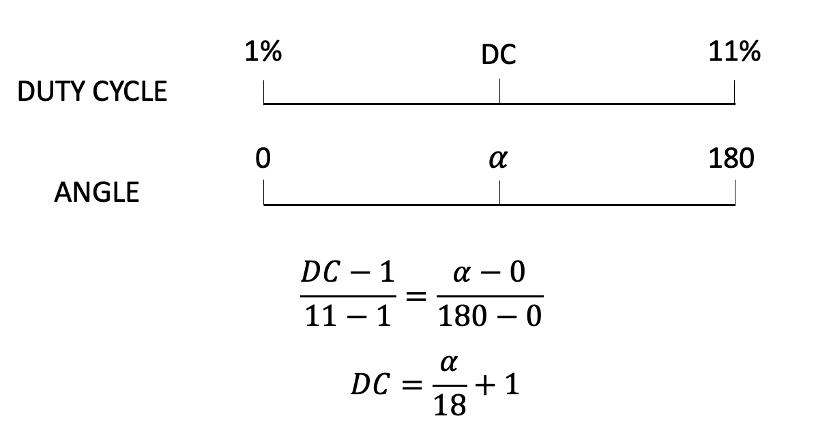
Step 3: The Pan-Tilt Mechanism
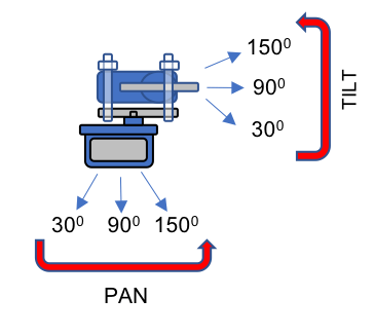
The "Pan" servo will move "horizontally" our camera ("azimuth angle") and our "Tilt" servo will move it "vertically" (elevation angle).
During our development we will not go to "extremes" and we will use our Pan/Tilt mechanism from 30 to 150 degrees only. This range will be enough to be used with a camera.
Web Control
We mainly use Flask to transmit video and achieve the interaction with Raspberry pi and webpage.
Step 1: Installing Flask and Creating the Video Streaming Server
We first install Flask on Raspberry Pi. and use it as a local Web Server. Then create a folder named "project", where save our python scripts. This folder has 2 sub-folders: static for CSS files and JavaScript files and templates for HTML files.
We load the Flask module into the Python script and create a Flask instance called app. Once this script is running from the command line at the terminal, the server starts to "listen" on port 5000. We use “route()” decorator to tell Flask what URL should trigger the function. For example, we add “@app.route(“/”)” before the "index()" function. The program will run this function when someone accesses the root URL ('/') of the server. This is the technical basis for how we can implement different functions in different subpages.
Step 2: Displaying Real-time Face Recognition in Video
To show the face recognition result, we capture the frame from the video and use these frames as the input of the face recognition model. The final frame is combined with the original frame and the output of the model (team members names and the rectangular label), which is transmitted to the webpage. Hence, the video we see on the web is made up of consecutive processed frames.
In the program, the frame that combined the original frame and the face recognition result is called “outputFrame”. It’s also the frame that will be transmitted to the webpage. Thus, two functions may read and write “outputFrame” at the same time. Two avoid conflict, we use “threading.Lock()” to control these two functions. In the program, both uploading and writing “outputFrame” must be executed when the lock is available. When the writing function wants to add the face recognition labels on the “outputFrame”, it will acquire the lock automatically. Therefore, the uploading function will not read the frame as the lock is used now. After the new “outputFrame” is written, the writing function will release the lock. And now, the uploading function will acquire the lock and transmit this new “outputFrame” to the web. The writing function will not be able to add the label on the frame until the previous uploading is finished. Hence, some outputs of the face recognition model will not be added to the original frame because it can’t acquire the lock at that time. That’s how we realize the real-time face recognition on the website without conflicts.
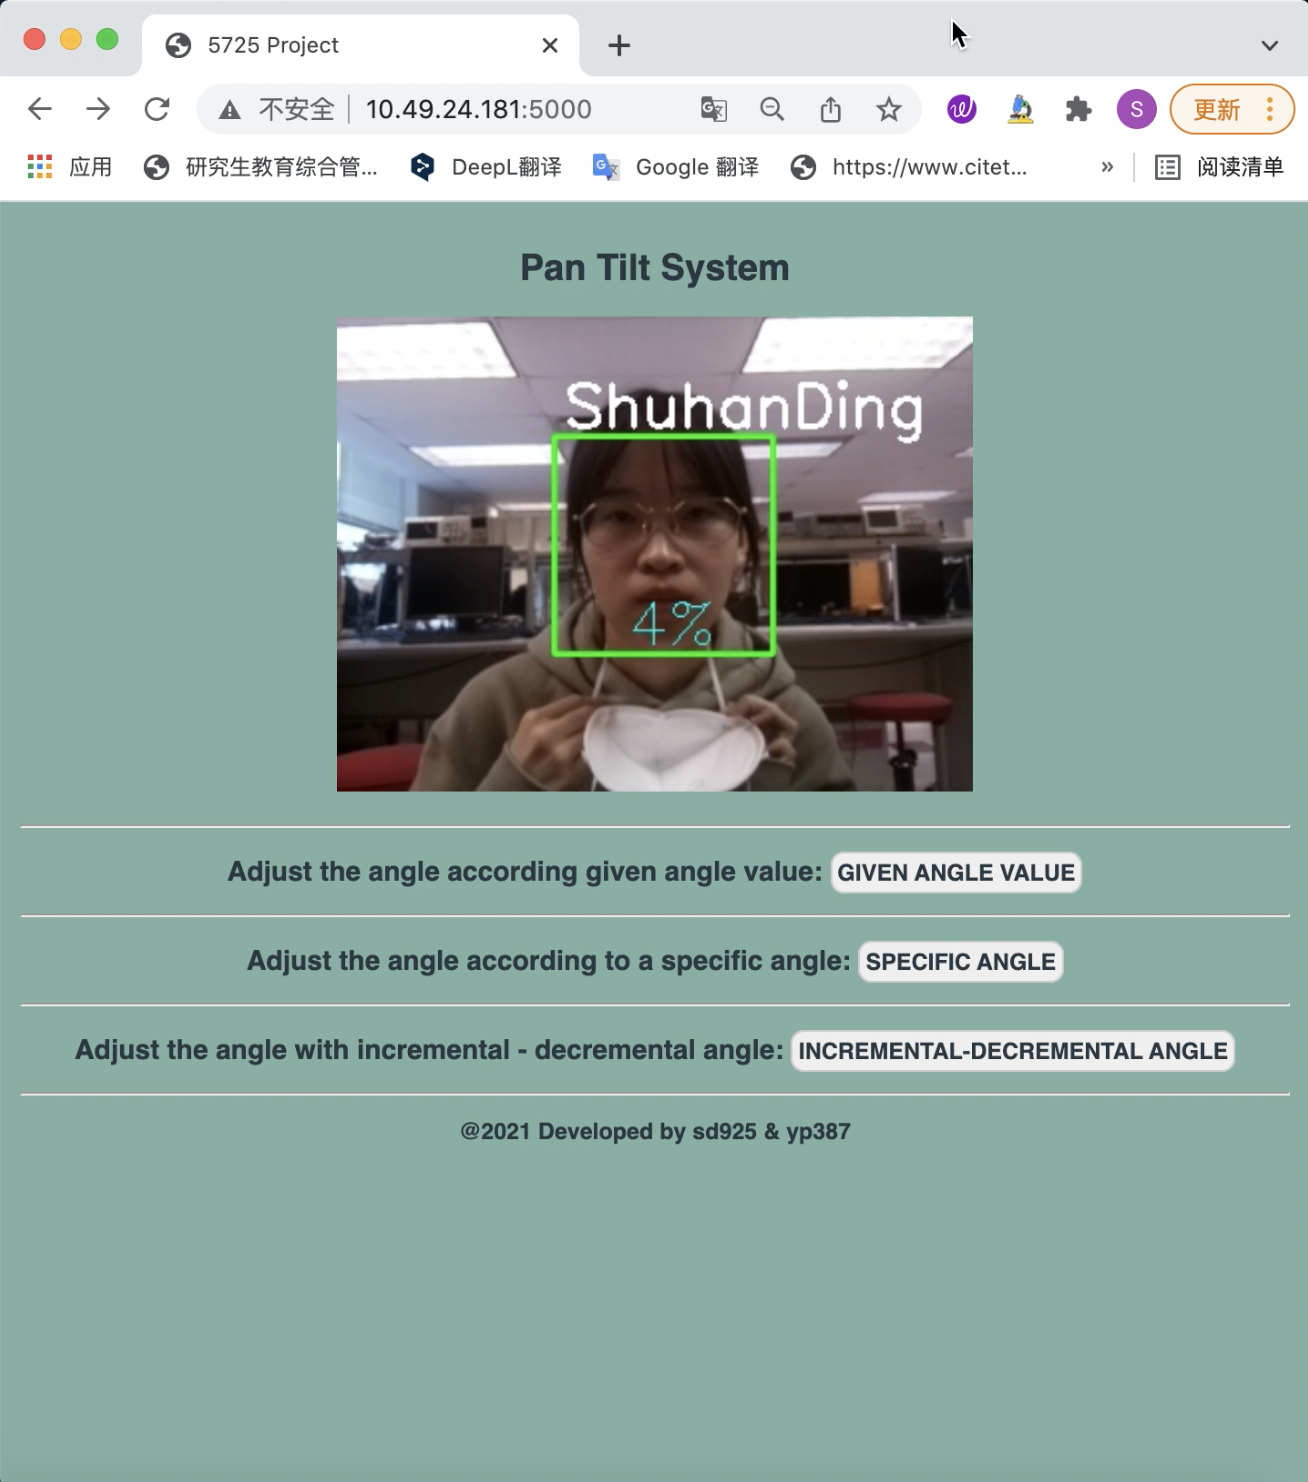
Step 3: Automatically Controlling Camera Position for Face Tracking
On the home page, the camera also enables face tracking. While getting the face label, we also obtained the coordinate information of the face. We determine whether the angle of the camera needs to be adjusted by calculating the centroid of the face. The face is expected to remain in the middle of the video frame at all times. We also consider some special cases. First, if the face does not move, the servo's jittering captures some frames outside the specified angle and the program will assume that the face is off-center and then execute the angle control function. However, this change in angle is not necessary. Therefore, we use the average of five consecutive face positions as the current face position, as a way to eliminate the effect of servo jittering. Apart from that, if the camera cannot find the face in the consecutive three frames, the camera will return to its initial position, which is 90 degrees both horizontally and vertically.
Step 4: Communicating between Raspberry Pi and Webpage
The Communication between Raspberry Pi and the webpage is realized by the socket. We import the “socketio” and the “flask_socketio” libraries in the python script and initiate the socket when we start the program. The socket is similar to a channel that transmits information in one direction. The user's actions on the web page will be converted into a python file acceptable data format and transmitted to the Raspberry Pi. To be able to use the same angle adjustment function in the python script, we added a helper function called "btn()" for each subpage's HTML file. The function will convert the operation on the webpage into a uniform format data. The data consists of two parts, the string variable "servo" and the numeric variable "angle". The “servo” variable has two possible values, pan and tilt. For example, If the user wants to adjust the horizontal angle to 100 degrees and the vertical angle to 80 degrees, two messages will be generated: {"pan", 100} and {"tilt, 80}. These two messages will be sent to the Raspberry Pi via sockets. Once the Raspberry Pi receives the update message, it performs the angle adjustment function to adjust the angle of the specified servo. This is the technical basis for manual camera angle adjustment.
Step 5: Manually Controlling the Camera Position in Three Ways
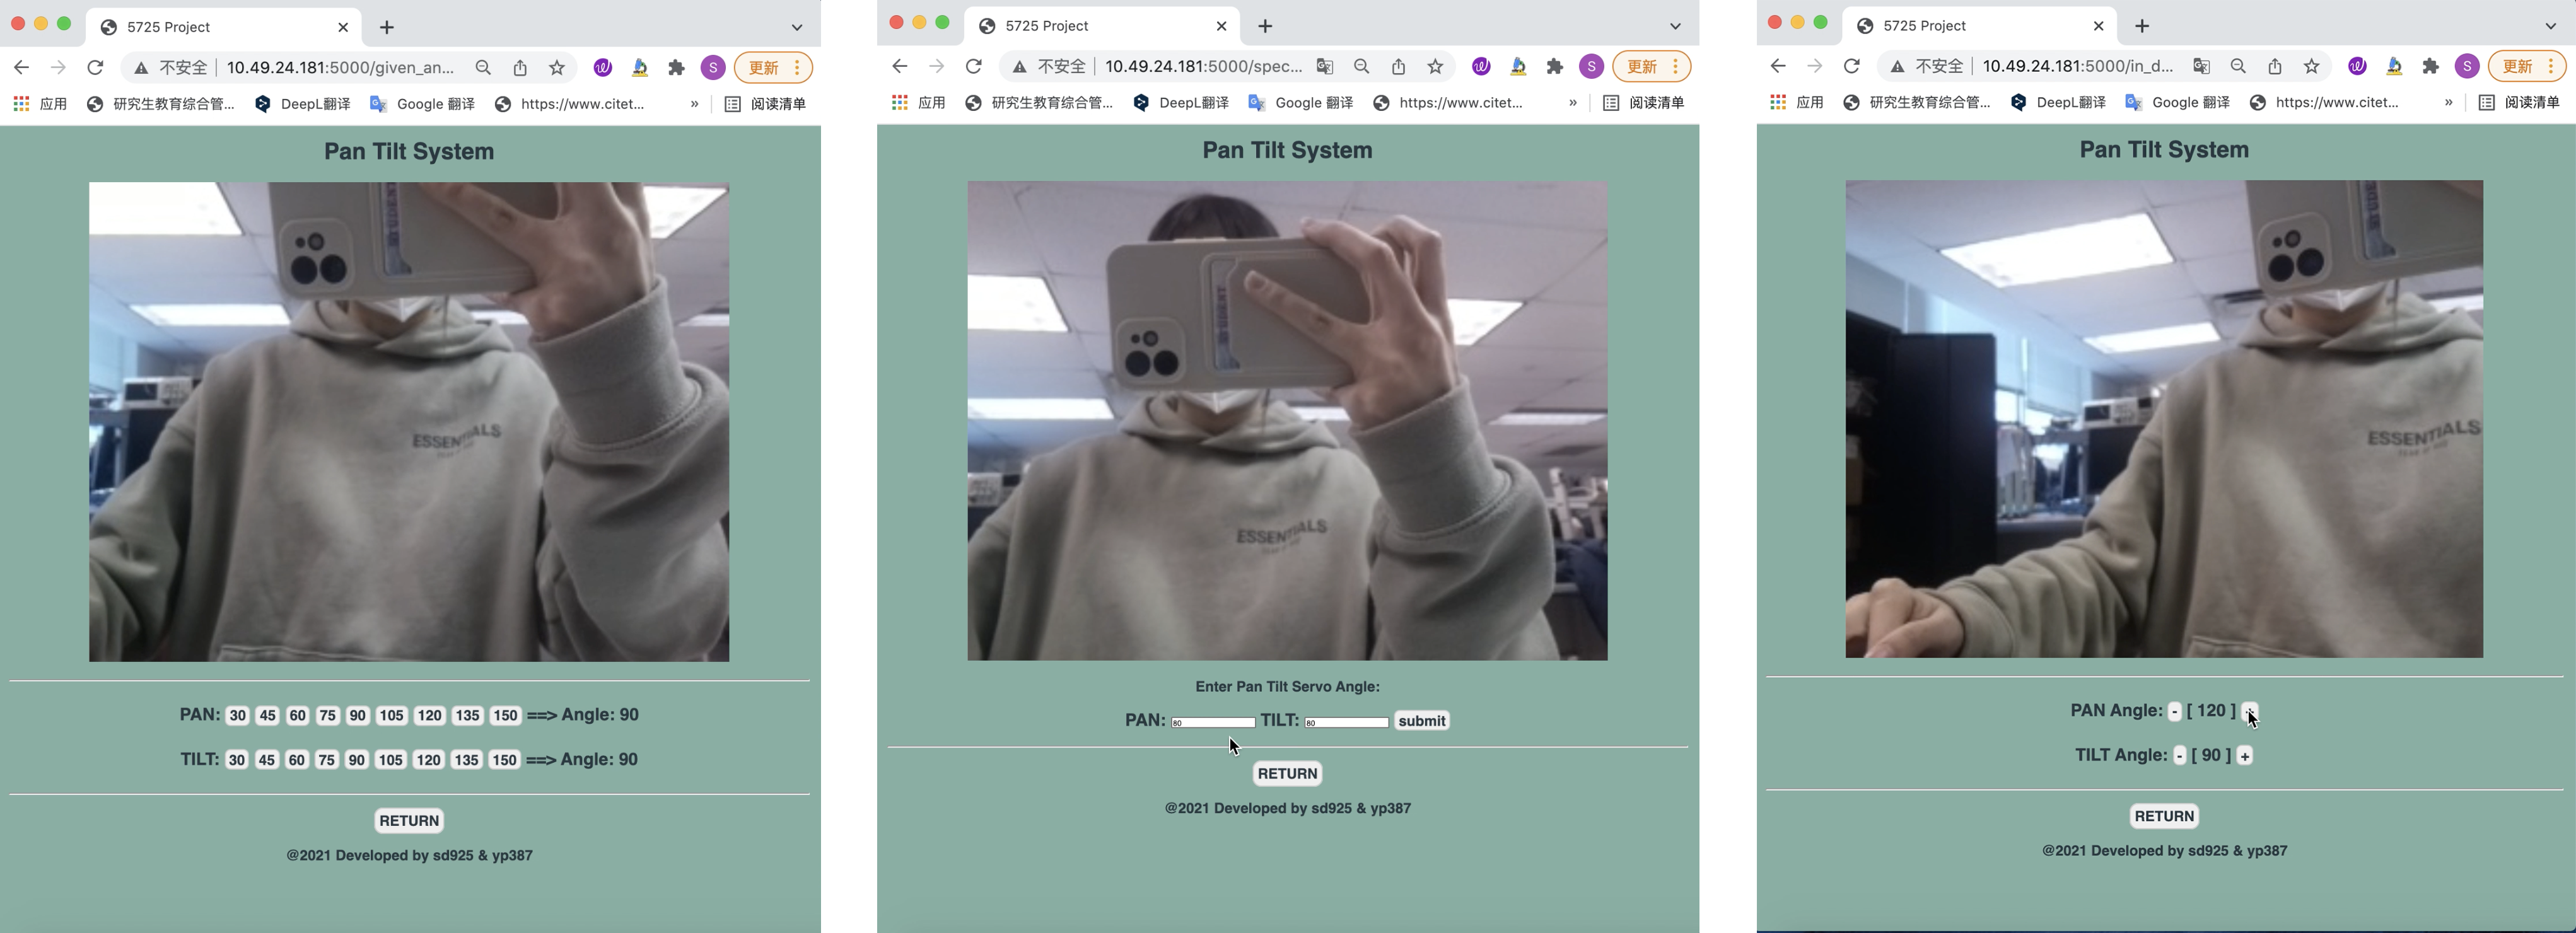
If we want to choose the angle of the camera manually, there are three choices available on the home page. Click the button and we will go to other pages. On the given-angle control page, we have provided some specific angle values ranging from 30 to 150 degrees. We can use the current camera angle displayed on the web page to decide on the next adjustment. On the specific-angle control page, we can make the camera reach any specified angle within the allowed range, and the angle can even be a decimal. The allowed range of the camera is the same as that on the first page. On the last page, each time you click on the plus or minus sign, the angle will change by 10 degrees. All the angle adjustment requests will be passed to the RPI server and implemented by the "setServoAngle" function in the python script. At the bottom of every page, there is a “Return” button, we will go back to the home page after clicking it.
Testing
Start the program by running the “5725.sh” in the terminal, and open a browser and enter the IP of the Raspberry Pi. The port number is set to 5000. The video is embedded in the webpage now. When there were faces in the video, the label of the face displayed. When we moved, the camera changed the angle and tracks our face successfully. Thanks to using the average face position result of the latest five frames instead of using the position of one frame, the camera kept tracking the face although there was some jittering on the servo. When we were out of the camera sight for a long time, the camera went back to its initial position, ready for the new face tracking.
When we jumped to the subpages, the face recognition kept working well. And three different ways to control was convenient to set the angle to an ideal position. Although we used the software PWM, the servo worked smoothly.
During the testing, we also found some problems. Firstly, we encountered some failures due to broken hardware. We checked the connection of the components and replaced the servo. Aecondly, we found that the face recognition model in opencv is very sensitive to light. When we trained the model with the dataset taken in the dormitory and tested it in the lab, it did not work well. Therefore, we expanded the dataset to include some images from a dimly lit dormitory and some images from a well-lit lab. The accuracy of the recognition has been improved very well.
Results and Conclusions
We finally succeeded in implementing the pan tilt system. First, for face recognition, we implemented face recognition of the team members with opencv's harr cascade training model. We use blue boxes, IDs and confidence values to show our results. For faces that have not been collected, our algorithm shows their id as unknow.
Secondly, we achieved the face tracking. By calculating the coordinates returned by the face recognition and mapping them to the duty cycle of servos' PWM, we get the relationship between the face coordinates and the rotation angle of the servo, so that we can achieve the face tracking and keep the face in the center of the screen all the time. Moreover, we have optimized the face tracking by adding several judgment conditions to control the rotation of the servo. We calculate the average coordinates of five frames as the final return, and if the coordinates of three consecutive frames have the same value, we consider the coordinates untrustworthy and do not track them. When the face is in the center of the screen, we set the servo not to rotate. When no face is detected, we set the servo to return to the initial angle (90, 90) and keep it in this state until the next face is detected.
Finally, we applied the above functions on the web side to achieve remote video monitoring and servo control. This is mainly done by flask, we regard the Raspberry Pi as a server, upload the data to the cloud through video streaming, and then through access to the cloud, achieve control on the web. Our web side, contains a main program and three sub-programs. The main program is implemented on the homepage and completes the automatic face tracking. The recognized faces are marked and the servo rotates with the faces to keep them in the center of the screen. For the three sub-pages, the control of the servos is implemented in three different ways, Angle Buttons, Decremental Angle Buttons and POST Approach.
Future works
First, we consider how to improve the accuracy of face recognition. We currently use 200 images for training, and the easiest way is to increase the dataset. Since pi camera is sensitive to light, we can also consider, collecting face data in different environments. Secondly, we can also choose other training methods and change the training parameters as well as the recognizer.
Besides, we also want to implement the priority setting for face tracking. When multiple faces are detected, we set the priority for different IDs, and the faces with higher priority will be tracked first, which means that we can implement tracking for a particular face and not tracking for other faces.
Finally, we can try to process it on multiple kernels. Because our current approach is not split-threaded, all the workload is pressed into one core. With multi-kernel processing, the training and recognition speed can be faster. The video will be more smooth.
Work Distribution

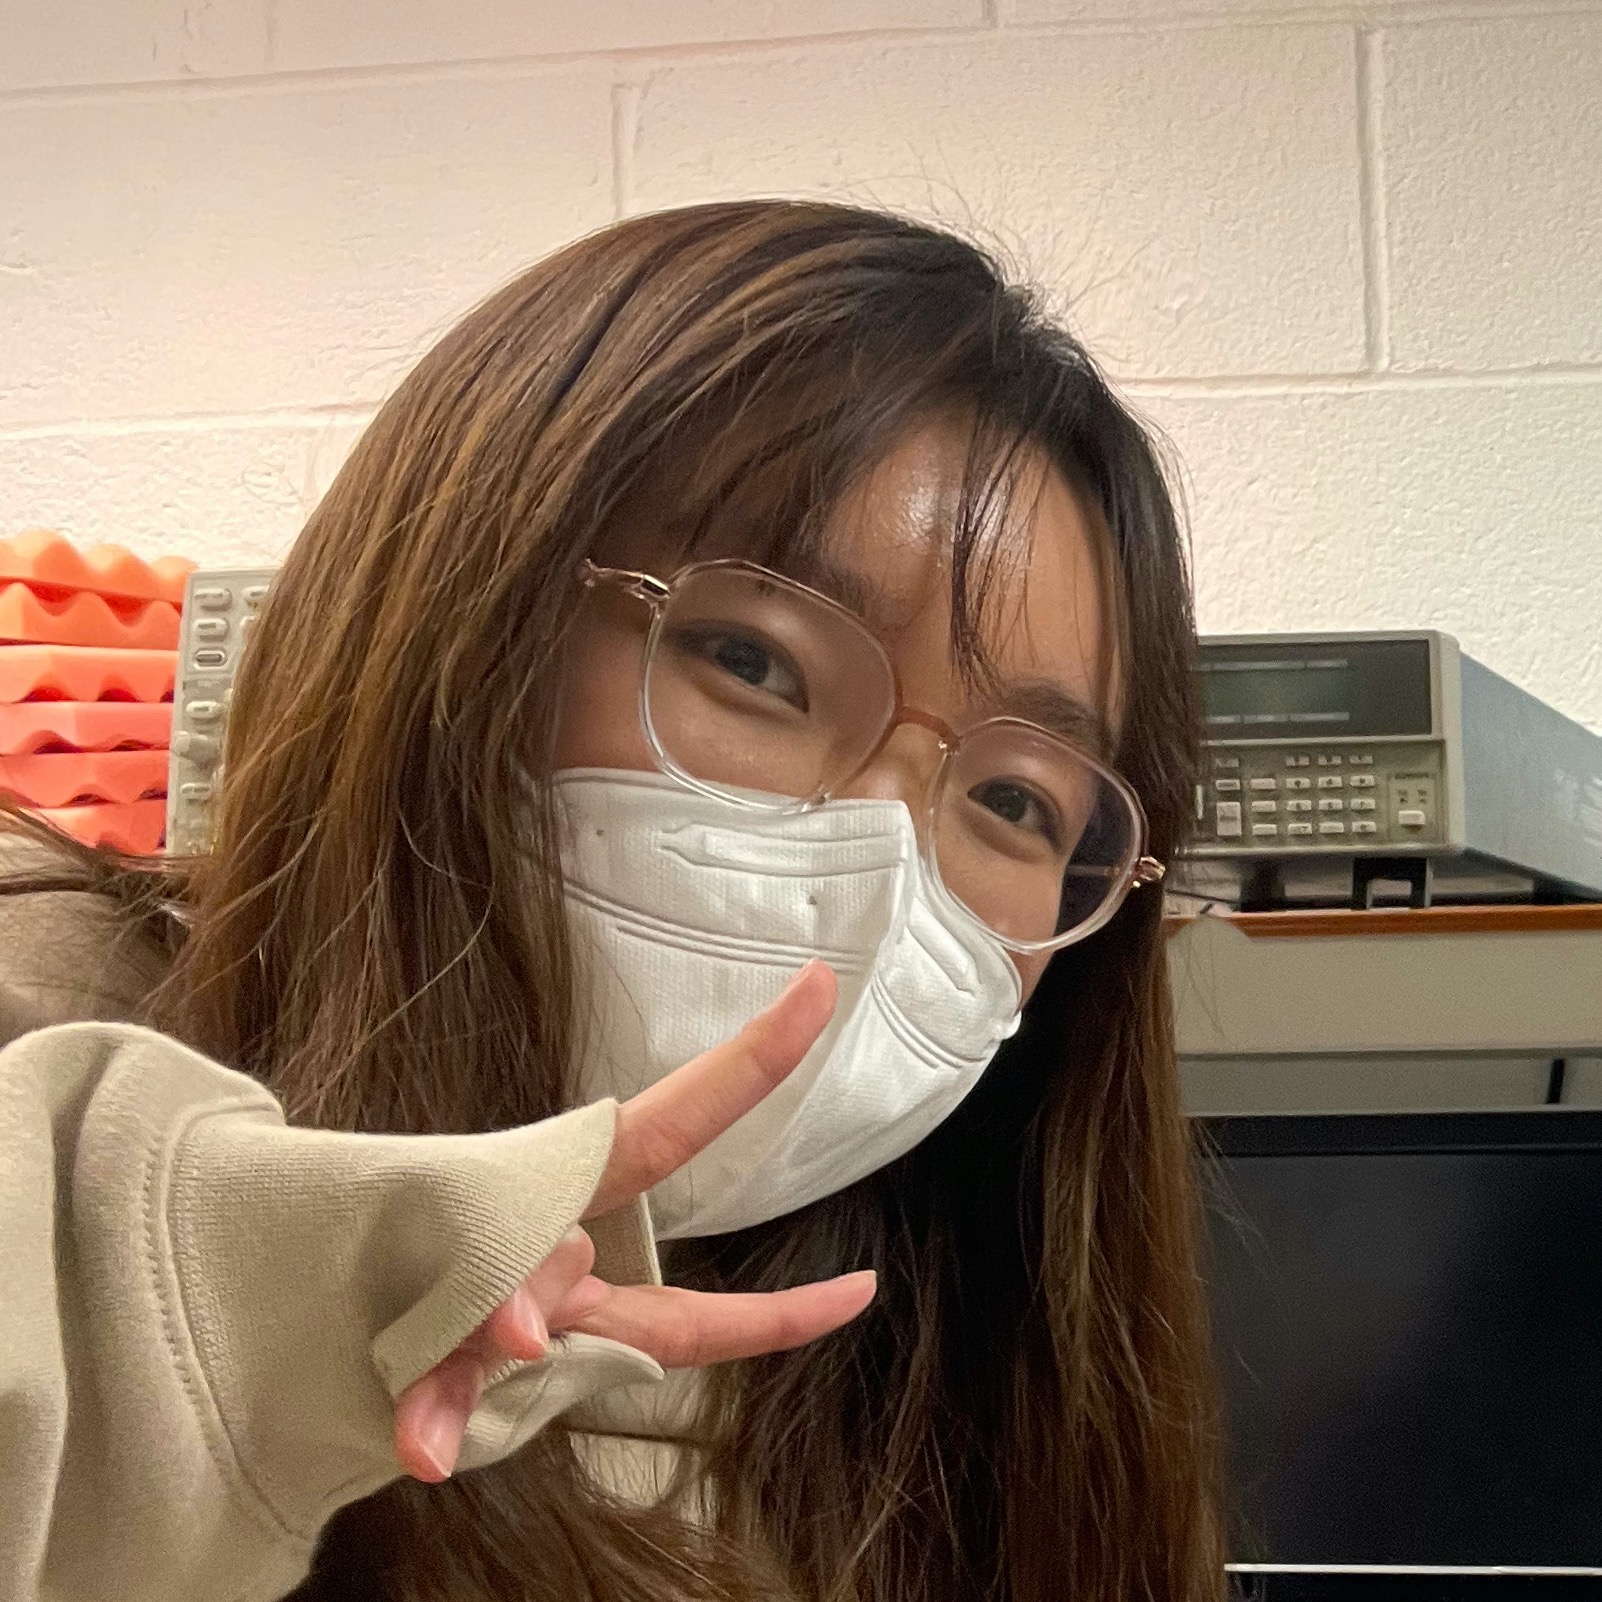
Project group picture
Yiling Peng
yp387@cornell.edu
Software development.
Responsible for face tracking and web control parts.
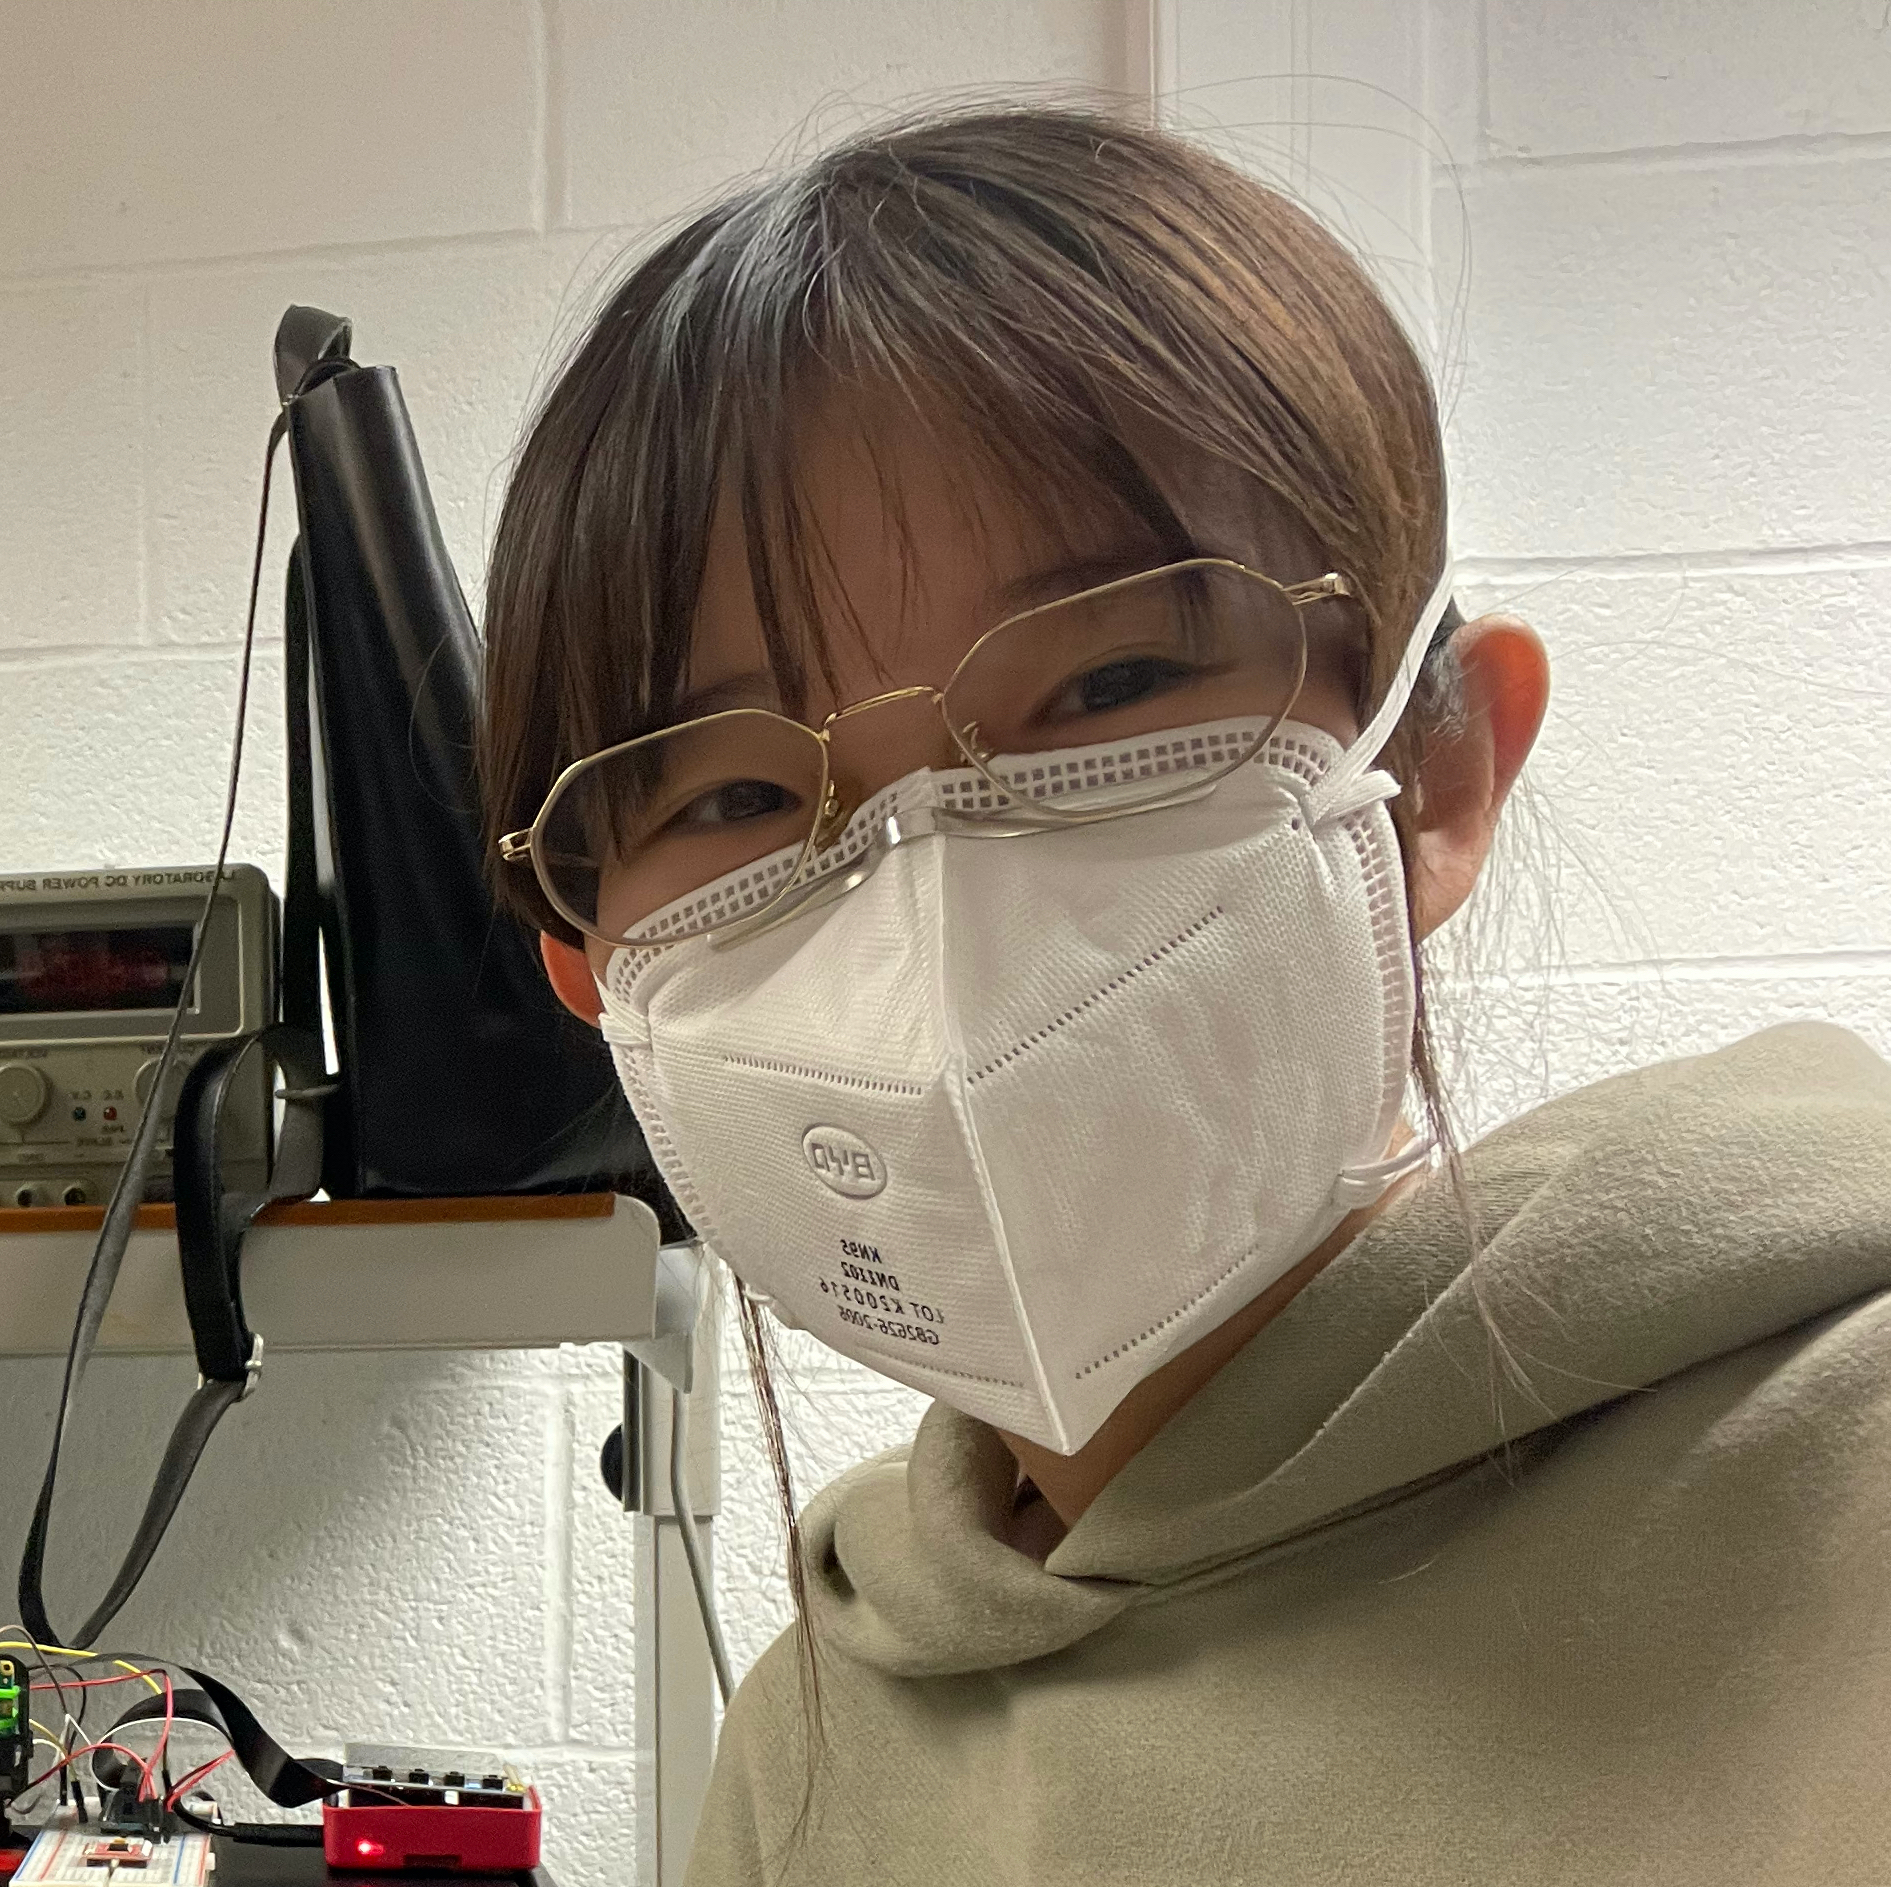
Shuhan Ding
sd925@cornell.edu
Hardware testing.
Responsible for face recognition and servo cantrol parts.
Parts List
- Raspberry Pi $35.00
- Raspberry Pi Camera V2 $25.00
- Gimbal frame $15.00
Total: $75
Code Appendix
Code listings
Code
Github Repository#!/usr/bin/env opencv-env from flask import Flask, render_template, Response, request from camera_pi import Camera import cv2, os, time, threading import numpy as np import urllib.request from time import sleep import RPi.GPIO as GPIO import socketio, flask_socketio # motor GPIO.setmode(GPIO.BCM) GPIO.setwarnings(False) panPin = 27 tiltPin = 17 GPIO.setup(panPin, GPIO.OUT) GPIO.setup(tiltPin, GPIO.OUT) def setServoAngle(servo, angle): assert angle >=30 and angle <= 180 pwm = GPIO.PWM(servo, 50) pwm.start(8) dutyCycle = angle / 18. + 1 pwm.ChangeDutyCycle(dutyCycle) sleep(0.3) pwm.stop() global panServoAngle global tiltServoAngle panServoAngle = 89 tiltServoAngle = 90 # face position global xPosition, yPosition # auto global move global consecutiveLoss move, consecutiveLoss = True, 0 xPosition, yPosition = [], [] xP = 160 yP = 120 auto = 2 def changeAuto(x): global auto, lock with lock: auto = x return def servoPosition(): global panServoAngle, tiltServoAngle global xPosition, yPosition if len(xPosition) >= 5: print(xPosition, yPosition) if (sum(xPosition)//5 < 130): panServoAngle += 5 if panServoAngle > 150: panServoAngle = 150 setServoAngle(panPin, panServoAngle) elif (sum(xPosition)//5 > 190): panServoAngle -= 5 if panServoAngle < 30: panServoAngle = 30 setServoAngle(panPin, panServoAngle) elif (sum(yPosition)//5 > 140): tiltServoAngle += 5 if tiltServoAngle > 150: tiltServoAngle = 150 setServoAngle(tiltPin, tiltServoAngle) elif (sum(yPosition)//5 < 100): tiltServoAngle -= 5 if tiltServoAngle < 30: tiltServoAngle = 30 setServoAngle(tiltPin, tiltServoAngle) xPosition, yPosition = [], [] # Flask app = Flask(__name__) flaskSocketIO = flask_socketio.SocketIO(app) outputFrame = None lock = threading.Lock() autoL = threading.Lock() # root page @app.route('/') def index(): """Video streaming home page.""" global auto changeAuto(1) print("if auto detect: ", auto) return render_template('index.html') # first page @app.route('/given_angle.html') def given_angle(): global auto changeAuto(2) print("if auto detect: ", auto) templateData = { 'panServoAngle' : panServoAngle, 'tiltServoAngle' : tiltServoAngle } return render_template('given_angle.html', **templateData) # second page @app.route('/specific_angle.html') def specific_angle(): global auto changeAuto(2) return render_template('specific_angle.html') # third page @app.route('/in_de_angle.html') def in_de_angle(): global auto changeAuto(2) print("if auto detect: ", auto) templateData = { 'panServoAngle' : panServoAngle, 'tiltServoAngle' : tiltServoAngle } return render_template('in_de_angle.html', **templateData) def gen(): """Video streaming generator function.""" global outputFrame, lock while True: # acquire and release lock automatically with lock: # check if the output frame is available, otherwise skip # the iteration of the loop if outputFrame is None: continue # encode the frame in JPEG format (flag, encodedImage) = cv2.imencode(".jpg", outputFrame) # ensure the frame was successfully encoded if not flag: continue # yield the output frame in the byte format yield (b'--frame\r\n' b'Content-Type: image/jpeg\r\n\r\n' + bytearray(encodedImage) + b'\r\n') # require video @app.route('/video_feed') def video_feed(): """Video streaming route. Put this in the src attribute of an img tag.""" return Response(gen(), mimetype = 'multipart/x-mixed-replace; boundary=frame') # socket @flaskSocketIO.on("socket_set") def socket_set(data): global panServoAngle, tiltServoAngle print("socket_set: ", data) pin, angle = 0, 90 if data["servo"] == 'PAN': pin = panPin panServoAngle = data["angle"] angle = panServoAngle else: pin = tiltPin tiltServoAngle = data["angle"] angle = tiltServoAngle setServoAngle(servo=pin, angle=angle) return # initiate recognizer recognizer = cv2.face.LBPHFaceRecognizer_create() recognizer.read('faceRecognition/trainer/trainer.yml') cascadePath = "faceRecognition/haarcascade_frontalface_default.xml" faceCascade = cv2.CascadeClassifier(cascadePath) font = cv2.FONT_HERSHEY_SIMPLEX #initiate id counter id = 0 # names related to ids: example ==> Marcelo: id=1, etc names = ['None', 'ShuhanDing', 'YilingPeng'] def recognize_face_from_mjpg_stream(): global outputFrame, lock, lockMoving global xP, yP, xPosition, yPosition global panServoAngle, tiltServoAngle global move, consecutiveLoss # auto while True: stream = urllib.request.urlopen( "http://{}:8080/?action=snapshot".format(SERVER_ADDR)) imgnp = np.array(bytearray(stream.read()), dtype=np.uint8) img = cv2.imdecode(imgnp, -1) gray = cv2.cvtColor(img, cv2.COLOR_BGR2GRAY) faces = faceCascade.detectMultiScale( gray, scaleFactor=1.2, minNeighbors=5, ) # cxP, cyP = 160, 120 for (x, y, w, h) in faces: xP = int(x+w/2) yP = int(y+h/2) cv2.rectangle(img, (x, y), (x + w, y + h), (0, 255, 0), 2) id, confidence = recognizer.predict(gray[y:y + h, x:x + w]) # Check if confidence is less them 100 ==> "0" is perfect match if (confidence < 100): id = names[id] confidence = " {0}%".format(round(100 - confidence)) else: id = "unknown" confidence = " {0}%".format(round(100 - confidence)) cv2.putText(img, str(id), (x + 5, y - 5), font, 1, (255, 255, 255), 2) cv2.putText(img, str(confidence), (x + 5, y + h - 5), font, 1, (255, 255, 0), 1) if auto == 1: if len(faces) == 0 and (panServoAngle != 90 or tiltServoAngle != 90): if consecutiveLoss == 3: move = False panServoAngle, tiltServoAngle = 90, 90 xPosition, yPosition = [], [] xP, yP = 160, 120 setServoAngle(panPin, 90) setServoAngle(tiltPin, 90) consecutiveLoss = 0 else: consecutiveLoss += 1 elif len(faces) > 0: move = True # acquire and release lock automatically with lock: outputFrame = img.copy() if move and auto == 1: if len(xPosition) < 5: xPosition.append(xP) yPosition.append(yP) else: servoPosition() # SERVER_ADDR = "10.49.38.17" # SERVER_ADDR = "192.168.1.144" if __name__ == '__main__': SERVER_ADDR = os.environ.get('IP') print("PYTHON GET IP: ", SERVER_ADDR) # iniciate socetio sio = socketio.Client() sio.connect("http://{}:5000".format(SERVER_ADDR)) time.sleep(1) t = threading.Thread(target=recognize_face_from_mjpg_stream) t.daemon = True t.start() # app.run(host='0.0.0.0', port =5000, debug=True, threaded=True) flaskSocketIO.run(app, debug=True, host=SERVER_ADDR)